Configuration | Streams → Lookup Setup
Lookup Setup
The purpose of the Lookup Setup screen is to create Lookup Names that are attached to attributes, which in turn are attached to values (Fig. 1). Lookups can be used globally within all job configuration mapping sections.
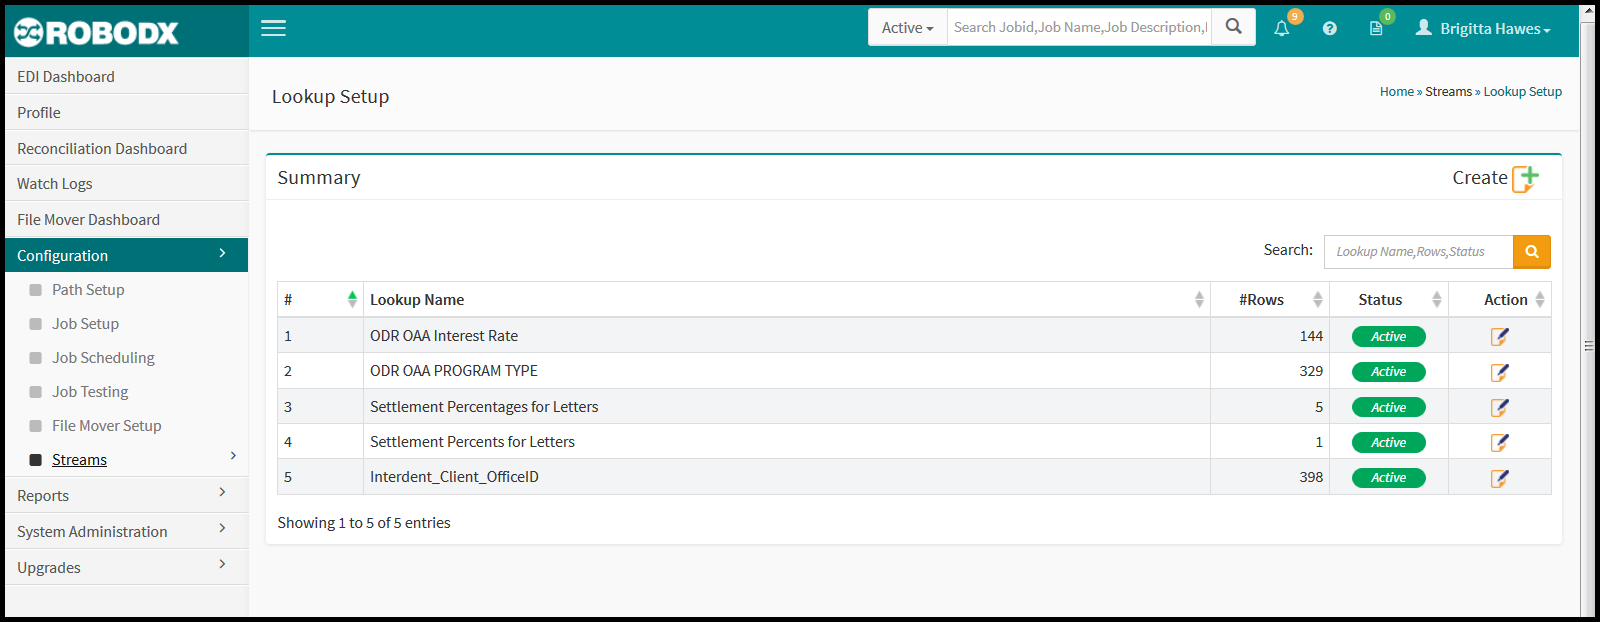
[Fig. 1]
Where are Lookups Used?
The best example of where we use the lookup tables from the Lookup Setup screen, is in job 1690 for client OAA. This particular client sends us accounts from many different departments, and we need to put the name of the department that each account is from in the Account For field in ARTrail®. However, the client does not send us the name of each department, only the the department's code. Similarly, for each account's interest rate, they do not send us the actual rate, they send us an interest code that we need to turn into a rate. If you go to the mapping tab in job 1690, and scroll down to where the Account For and Interest Percentage fields are mapped, you will see the two functions called Load Lookup Details that we mention above.
There are currently only three jobs that reference lookup names: Job 1690, Job 1206 & Job 1870. Fig. 2, below, shows the steps to reach the location of the lookup fields that can be used in a Job Setup's Mapping section. Using job 1690 as an example, we:
- Type in the Job ID in the header's search box. As you type in the Job ID, a drop down will appear below the search-box field with options. In this example, we will click on the Job ID for 1690. We are taken to the Job Setup screen for that Job ID.
- Click on the check mark icon located under Mapping. You will now be in the Mapping section of Job ID 1690.
- In Fig. 2, the section that deals with the lookup-table details are contained in the red-stroke section. If you cannot see the blue Load Lookup Details button in the Formula/Validation column, click on the view icon of TypeOfProgram or InterestRate in the Source Data Elements column (Fig. 2). By clicking on the Load Lookup Details button, the Formula popup appears with the variable assignment information.
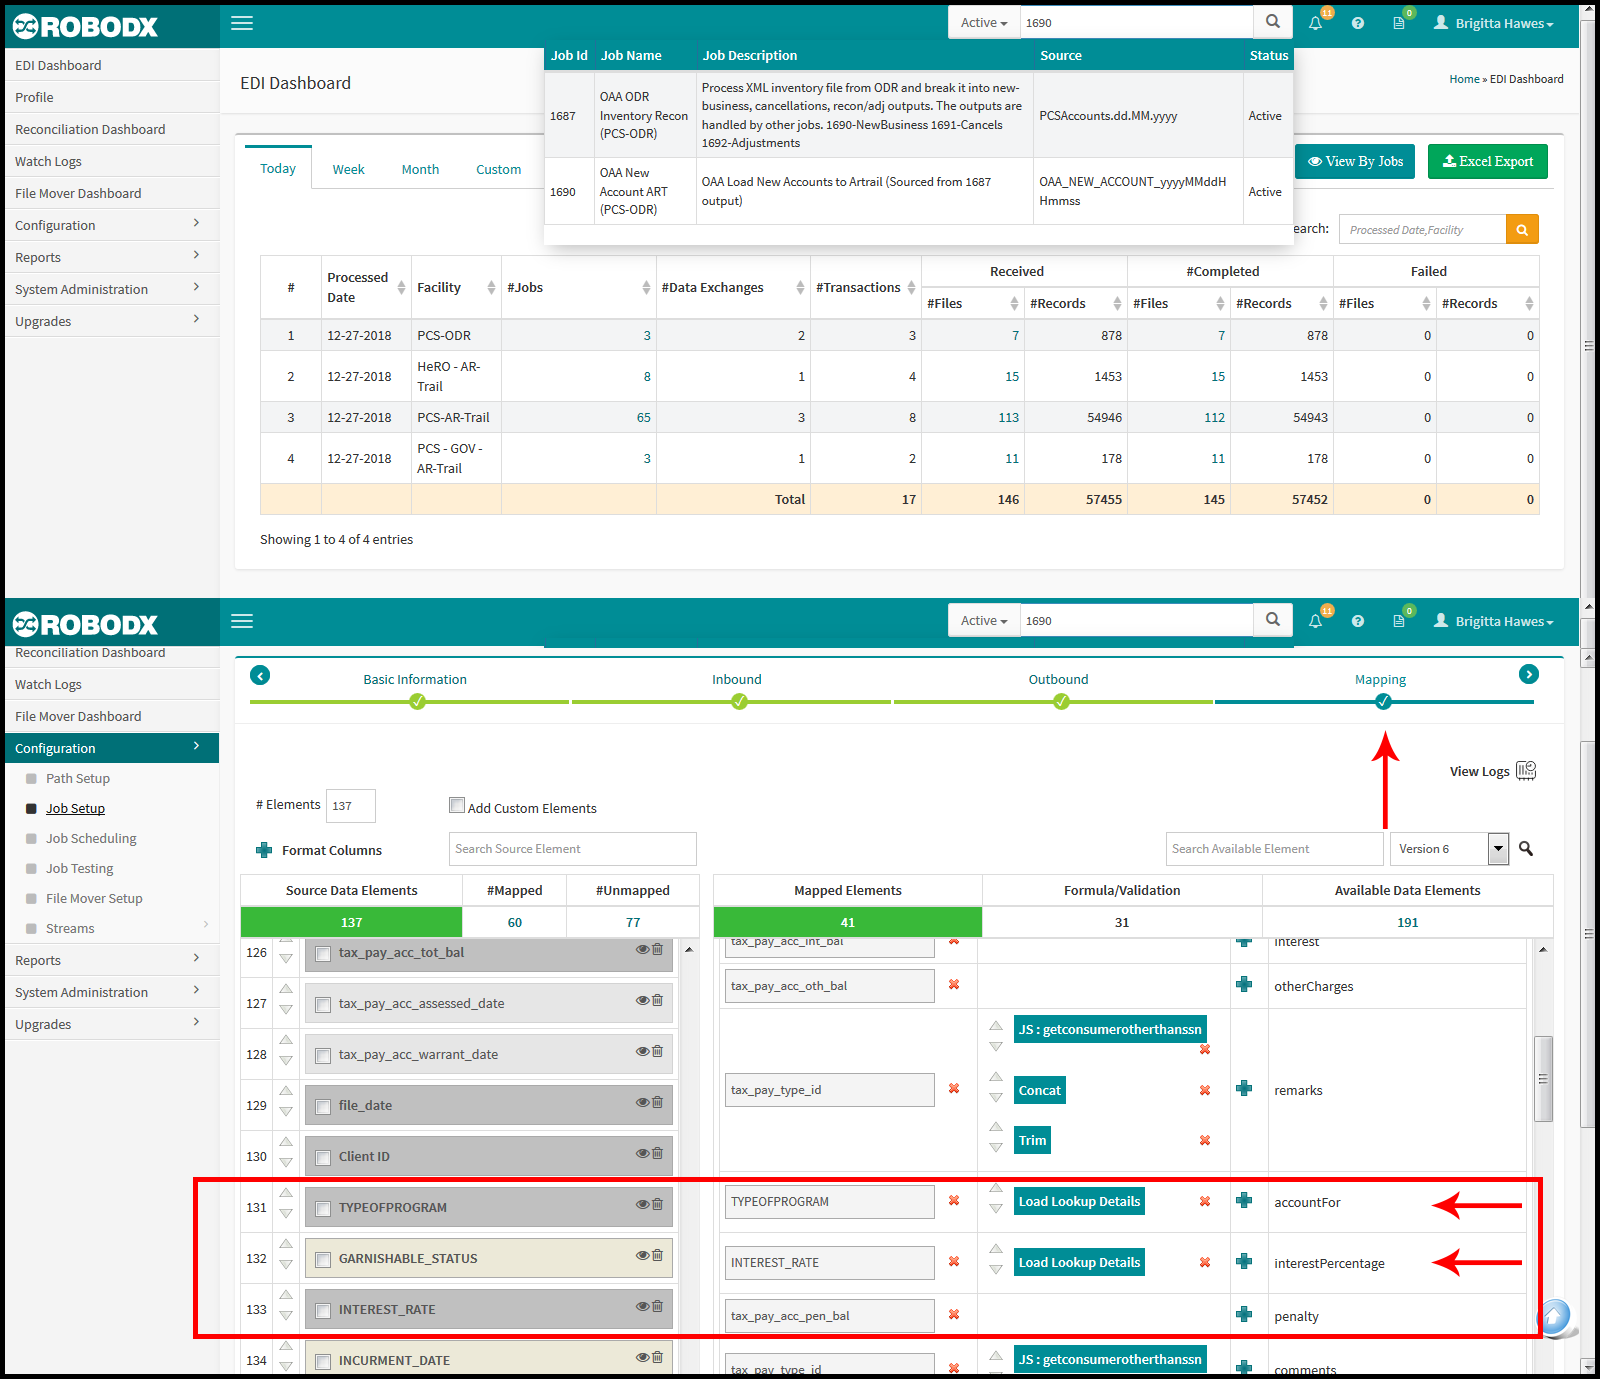
[Fig. 2]
Summary Table
On page load, a summary table will appear with all of the attributes created in the system (Fig. 1). Each attribute will have it's own individual criterion or criteria.
Columnar Definitions
#: Refers to the row number of the summary table.
Lookup Name: Refers to the name identified as the Lookup Name.
#Rows: Refers to the number of criteria rows associated with a Lookup Name's attributes.
Status: An Active status means that the Lookup Name is available for use within the system. An Inactive status means that the Lookup Name is not available for use within the system.
Actions: Clicking on the edit icon for the row you wish to edit, takes you to that lookup's Update screen. From here you can make your edits.
Update a Lookup
The Lookup Setup heirarchy is as follows:
- Lookup Name →
- Lookup Name Attribute(s) →
- Lookup Name Attribute(s) Values
- From the Summary table, click on the edit icon, located in the Action column for the row you want to update (Fig. 3). The Lookup Setup Update screen appears (Fig. 2). Using the Job ID 1690 example that we referenced above, you will note that the two lookup names (i.e., ODR OAA Interest Rate & ODR OAA Program Type) correspond with the fields in the Job Setup/Mapping fields shown in Fig. 2 above (i.e., TYPEOFPROGRAM & INTEREST_RATE).
- Note that in the example shown in Fig. 2, we selected row #4 from the Summary table, shown in Fig. 1.
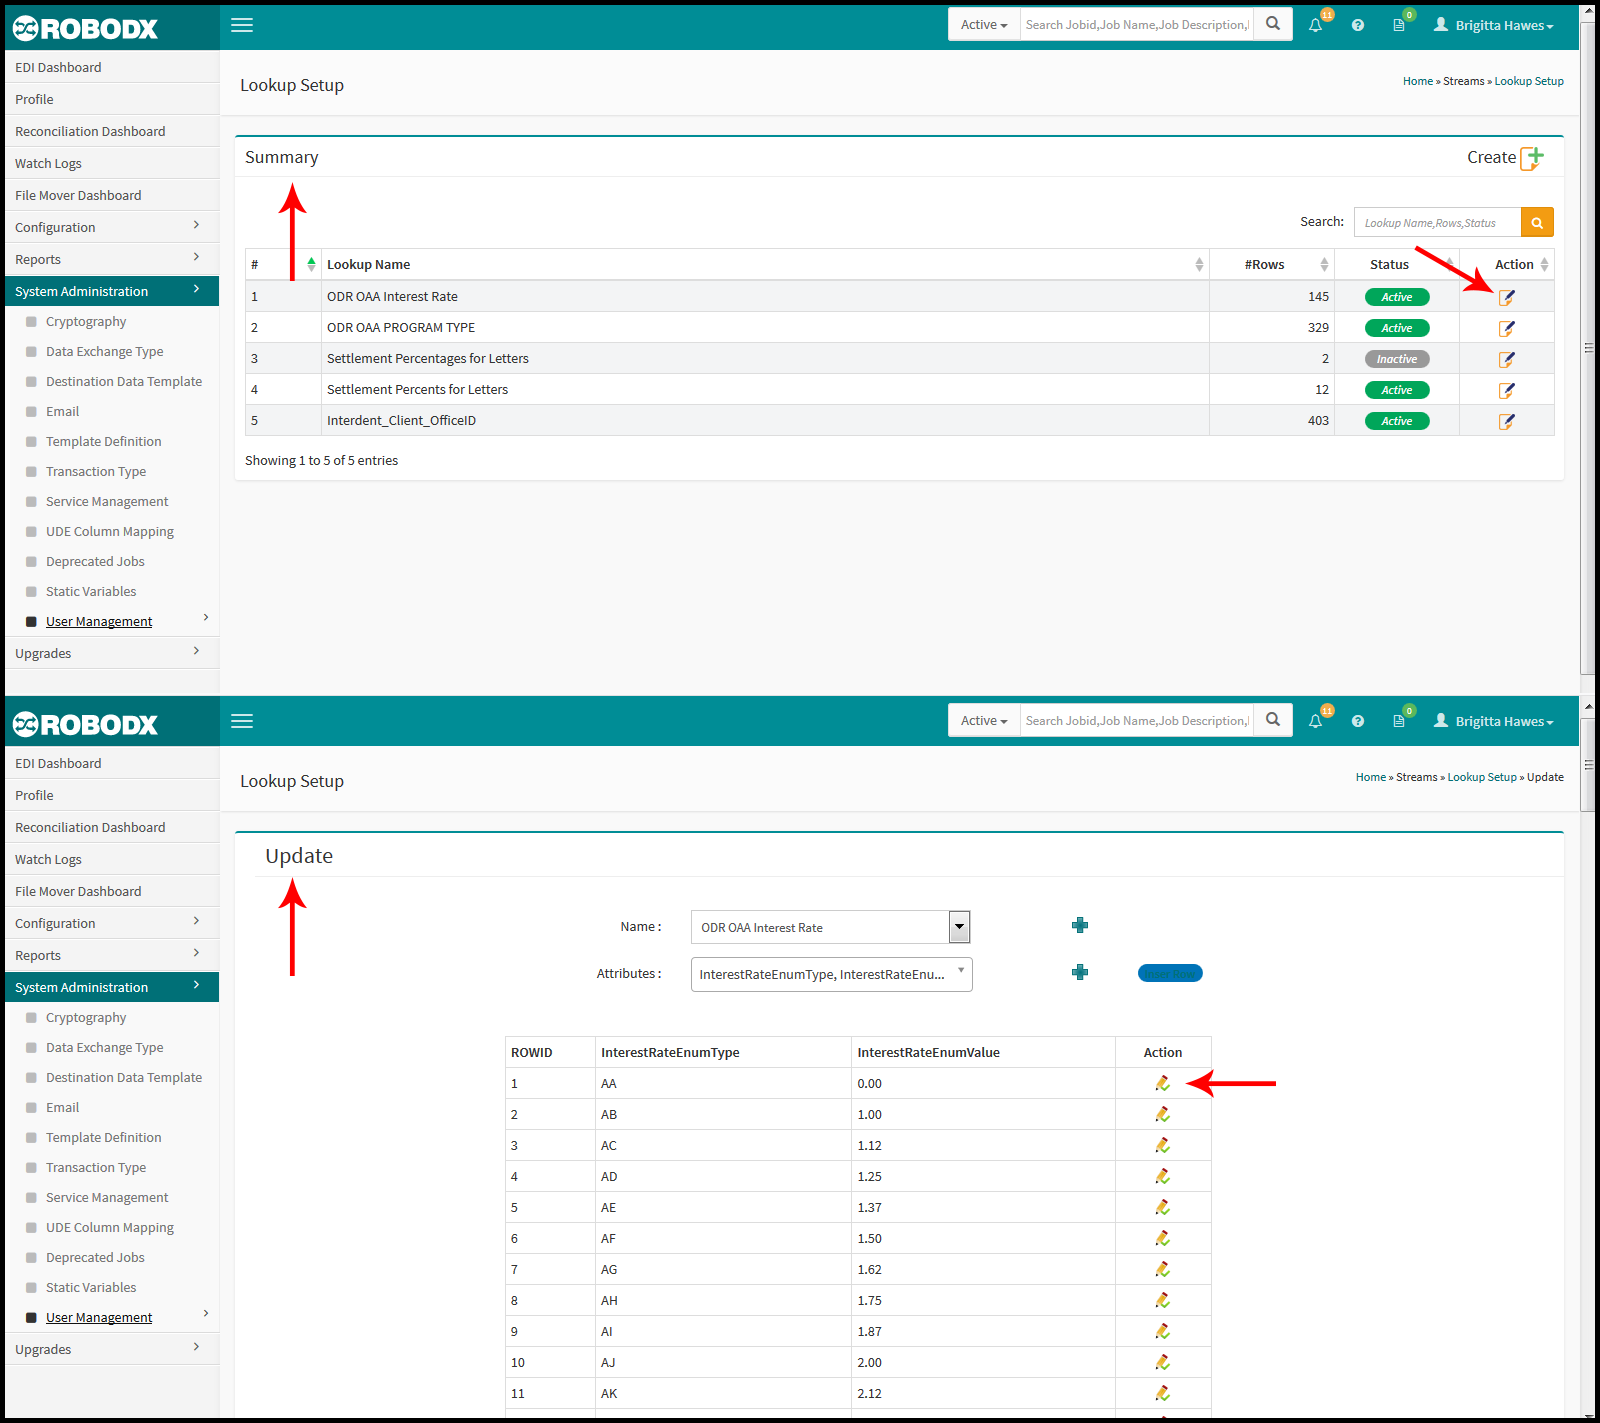
[Fig. 3]
-
Update Lookup Name:
- Click within the Name field to select another name for this lookup (Fig. 3). The options provided are limited to the ones already created within the system.
- Alternatively, you may create a new name for this lookup by clicking on the icon. The Add popup appears.
- Click within the Lookup Name field and type in your new name.
- Click on the Save button. The popup will close.
IMPORTANT: Adding a new Lookup Name, in this section, just changes the name of the lookup you are updating, and adds the new name to theName options field; it does not create a new lookup. To create a new lookup, you will need to see the instructions in the next section: Create a Lookup -
Update a Lookup Name's Attribute(s):
- Click within the Attributes field and select your attribute(s). Select one or more attribute options. To select all attributes, place a check mark within the Select All check box. Notice that in the screenshot provided (Fig. 2), both the LetterNumber and SettlementPercent attributes have been chosen, and as a result, they are the column headers for the criteria that will be listed for this lookup.
- Alternatively, you may add new attributs for this lookup by clicking on the icon next to the Attributes field. The Add popup appears.
- Click within the Attribute Name field and type in your new attribute name.
- Click on the Save button. The popup will close.
-
Update a Lookup Name's Attribute's Value(s):
- Click on the Insert Row button located to the far right of the Attributes field. An Add popup appears. Note that this add popup list all of this Lookups' selected attributes.
- Each row will need a value. Enter in the needed calue for each attribute.
- Click on the Save button. Your new row has been added to the below table.
-
Update a Table Row:
- Click on the edit icon for the row you want to edit.
- An Update popup appears. Update your attributes' values as needed.
- Click on the Update button to save. Alternatively, you can click on the 'X', located in the upper-right corner of the popup to exit without making or saving any changes.
-
Insert a Table Row:
- Whenever you want to add a new value to an attribute, you must insert a new row. Click on the Insert Row button to the left of both the Attributes field and its add icon. The Add popup appears.
- Add your new attributes' values.
- Click on the Update button to save. Alternatively, you can click on the 'X', located in the upper-right corner of the popup to exit without making or saving any changes. Notice that in the Update table, a new row has been added with your newly created value for this attribute. These new values will not be available within all job configuartion mapping sections through RoboDX.
Create a Lookup
- From the Lookup Setup's main screen (Fig. 1), click on the Create icon located in the upper-right corner of the screen. The Lookup Setup / Create screen appears (Fig. 3).
- Select a lookup name from the Name field, or create a new one by clicking on the add icon located to the right of the Name field.
- If you opt to add a new lookup name by clicking on the add icon, the Add popup appears. Type in your new lookup name with a name that makes sense to you.
- Click on the Save button to save your new lookup name. It will now be available in the Name select field as an option.
- Next, click within the Attributes field. A selection of options appears. Click on one or more choices to add to your new lookup name.
- If you opt to add a new attribute name by clicking on the add icon, the Add popup appears. Type in your new attribute name with a name that makes sense to you.
- Click on the Save button to save your new lookup name. It will now be available in the Attributes select field as an option.
NOTE: You may now see that the following structure of a lookup setup is as follows:
- Name = Table name
- Attribute = The table's column header-names
- Value = The columnar cells that within a specific column (attribute). An column may have an infinite number of values.
Adding Rows
Everytime you add a new value to an attribute, a row is added to the table. After you create a new lookup name and assign that lookup name attributes, you will need to create the actual values; otherwise, you will just have a table (lookup name), with attributes (columnar headers), but no values (table cell data). To create row 1 of your new table:
- Click on the Insert Row button to the left of both the Attributes field and its add icon. The Add popup appears.
- Add your new attributes' values.
- Click on the Update button to save. Alternatively, you can click on the 'X', located in the upper-right corner of the popup to exit without making or saving any changes. Notice that in the Update table, a new row has been added with your newly created value for this attribute. These new values will not be available within all job configuartion mapping sections through RoboDX.