Watch Logs
Watch Logs
The Watch Logs screen displays processed job details. The Overall tab is active on page load (Fig. 1). Job details are segmented using the following tab options:
- Overall
- Inbox
- Yet to Start
- In Progress
- Completed
- Failed
- Discrepancy, and
- Waiting for Approval.
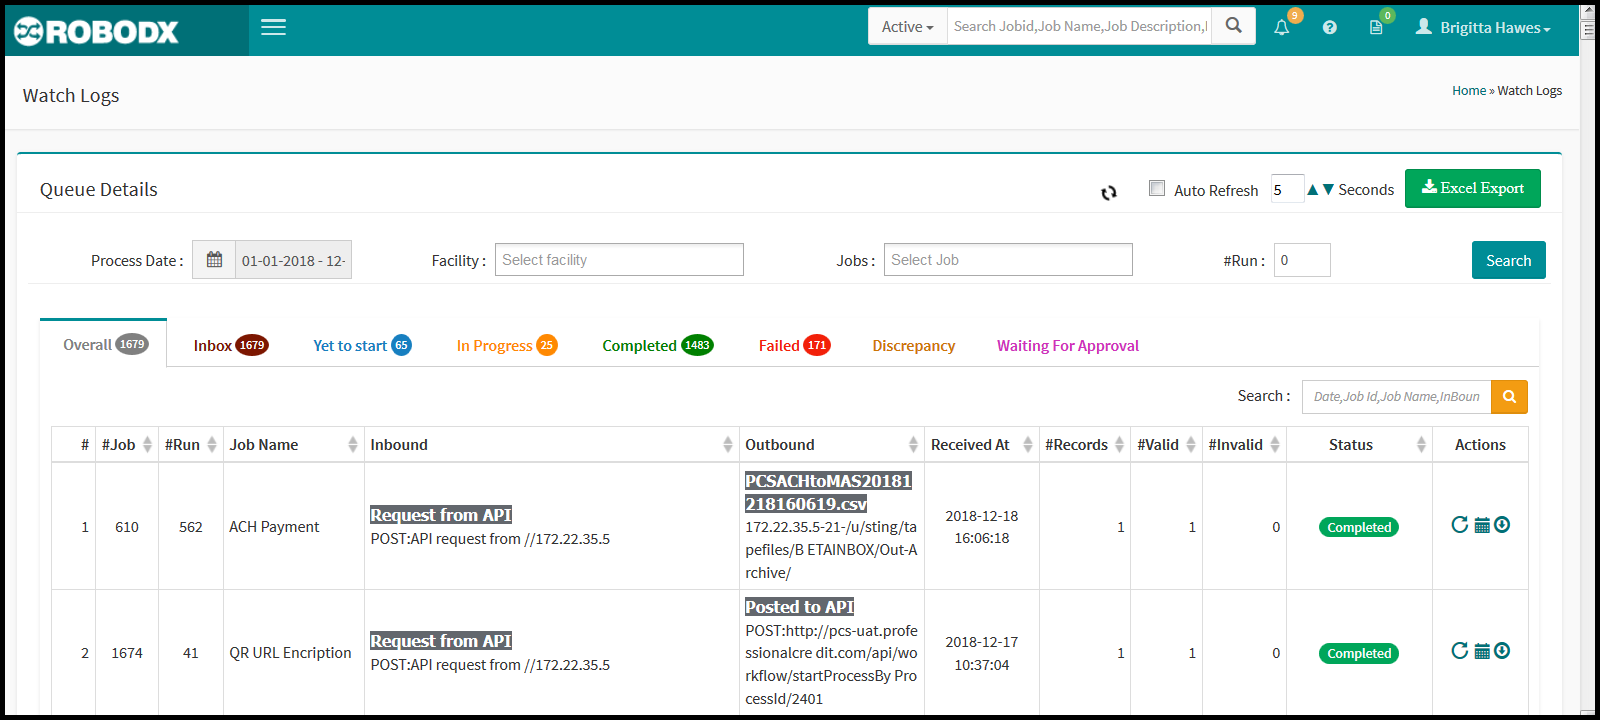
[Fig. 1]
Filter via Queue Details
The Queue Details section allows you to filter table results. The fields are the same regardless of what tab is active. To use:
- Process Date: Click within the Process Date field. A date-range calendar appears. Select your From and To date. Click on the Apply button when finished. Click on the Cancel option to exit the popup.
- Facility: Click within the Facility field to select one, or more of your agency's internal facility. Alternatively, leave unselected to auto-select all.
- Jobs: When you select a facility, or facilities, from the above field, the Jobs field, for that facility, or facilities, will populate in this option field; otherwise, all jobs for that date range will populate.
- #Run: -----
- Button [Search]: When ready, click on the Search button. Table results will appear within the table below based on your chosen search parameters.
Overall
The Overall tab provides an overview of the processed jobs and their statuses.
- #: Refers to the table's row number.
- #Job (aka Job ID) The unique identifier of a particular job. Not to be confused with File Name. NOTE: The job is what is doing the communicating and has its own name. The file is the information being communicated from the source and will have its own name as well. The two names are technically completely independent of each other. File names are sometimes similar to job names but that is merely a convention that EDI teams might sometimes use for clarity because the names of both are trying to be as descriptive as possible of the incoming information and process to handle that information.
- #Run: -----
- Job Name: Refers to the descriptive name given to a job.
- Inbound: Communication being transmitted into agency.
- Outbound: Communication being transmitted out of agency.
- Received At: Refers to the date and time that any file was received by the agency.
- #Records: Refers to the number of records within a file.
- #Valid: Refers to the number of records within a file that were processed successfully.
- #Invalid: Refers to the number of records within a file that were NOT processed successfully.
- Status: Displays the status of the job as completed or failed.
-
Actions:
- Reprocess Again: Click on the reprocess icon in the Action column for the row you would like to reprocess a job for. The Alert popup appears requesting that you confirm the reprocess.
- Click on the "OK" button to proceed.
- Click on the "Cancel" button to esit your request.
- Download Files: Click on the Download icon in the Action column for the row you would like to download a spreadsheet for. Your system's Open dialogue popup appears prompting you to either save the file, or open it.
NOTE: This download requires a program on your computer such as: Open Office or Microsft Excel.-
View Logs: Click on the Calendar icon in the Action column for the row you would like to view the Job logs for. The Job Audit Logs screen appears. The screen provides all of a job's information that was created durinf the Job Setup process, and provides the following functionality: Tabs for: Basic Information, Inbound, Out Bound and Mapping, and Buttons for Mapping Setup, Download Zip & Download PDF. We explain this functionality below.
- Tab [Basic Information]: The Basic Information tab is active by default on page load. This screen provides the user with a snapshot of the basic information for this job that was created in the Job Setup screen. When this tab is active, and if the user wants to edit any of the job's information, they may click on the Mapping Setup button. The Job Setup's Basic Information screen will open in a new browser window. Field definitions, for this tab, are explained in the Job Setup of this user guide.
- Tab [Inbound]: Clicking on the Inbound tab provides the user with a snapshot of the inbound mapping criteria for this job that was created in the Job Setup screen. When this tab is active, and if the user wants to edit any of the job's inbound-mapping information, they may click on the Mapping Setup button. The Job Setup's Basic Information screen will open in a new browser window. Clicking on the Inbound check mark icon, of the top progress bar, will take the user to the Inbound section of the Job Setup screen where they can make edits as needed. Field definitions, for this tab, are explained in the Job Setup of this user guide.
- Tab [Outbound]: Clicking on the Outbound tab provides the user with a snapshot of the outbound mapping criteria for this job that was created in the Job Setup screen. When this tab is active, and if the user wants to edit any of the job's outbound-mapping information, they may click on the Mapping Setup button. The Job Setup's Basic Information screen will open in a new browser window. Clicking on the Outbound check mark icon, of the top progress bar, will take the user to the Outbound section of the Job Setup screen where they can make edits as needed. Field definitions, for this tab, are explained in the Job Setup of this user guide.
-
Tab [Mapping]: Clicking on the Outbound tab provides the user with a snapshot of the outbound mapping criteria for this job that was created in the Job Setup screen. When this tab is active, and if the user wants to edit any of the job's outbound-mapping information, they may click on the Mapping Setup button. The Job Setup's Basic Information screen will open in a new browser window. Clicking on the Outbound check mark icon, of the top progress bar, will take the user to the Outbound section of the Job Setup screen where they can make edits as needed. Field definitions, for this tab, are explained in the Job Setup of this user guide. The Mapping tab section is divided into three segments: Element Mapping, Inbound Unmapped Elements and Outbound Unmapped Elements.
- Element Mapping: This segment allows for the user to view specific Mapping descriptors by clicking on the blue buttons in the Formula/Validation column for the mapped element they want to view. Again, field definitions, for this tab, are explained in the Job Setup of this user guide. To edit this section, click on the Mapping Setup button, and the Job Setup screen appears. Clicking on the Mapping check mark icon, of the top progress bar, will take the user to the Mapping section of the Job Setup screen where they can make edits as needed.
- Inbound Unmapped Elements: This segment shows a listing of the inbound-mapping elements that were not definied in the job setup process. To edit this section, click on the Mapping Setup button, and the Job Setup screen appears. Clicking on the Mapping check mark icon, of the top progress bar, will take the user to the Mapping section of the Job Setup screen where they can make edits as needed.
- Outbound Unmapped Elements: This segment shows a listing of the outbound-mapping elements that were not definied in the job setup process. To edit this section, click on the Mapping Setup button, and the Job Setup screen appears. Clicking on the Mapping check mark icon, of the top progress bar, will take the user to the Mapping section of the Job Setup screen where they can make edits as needed.
-
Button [Mapping Setup]: Clicking on the Mapping Setup button will take the user to the Job Setup screen for this job where they may make edits as needed.
- Button [Download Zip]: To download a copy of the processed job's input and output, click on this button. A zip file will be retrievable via your system's download folder.
- Button [Download PDF]: Clicking on the Download PDF button opens a PDF in your browser window with a summary of all of the tabular information shown in the Job Audit Logs screen for a specific job. From your browser view, you can view and/or save the PDF.
- Reprocess Again: Click on the reprocess icon in the Action column for the row you would like to reprocess a job for. The Alert popup appears requesting that you confirm the reprocess.
Inbox
The Inbox tab shows all of a processed job's details. They are grouped by job and the job's details, such as: In File Name, In Path, Out File Name, Out Path and Facility.
View Drop-Down Details
-
First Table: On tab load, the only table listings are the row# and the job name. To view further details for a specific job, click on the expand (plus) icon, for the job row that you want to view more job details for. The second table appears.
-
Second Table: The second table shows a listing of all files processed for that job. The columns associated with the second table are: In File Name, In Path, Out File Name, Out Path and Facility. Note that each column header is a clickable link. Clicking on any of these links opens up the third table.
-
Third Table: The third table shows a status for the file row you selected from the second table. Columnar data includes: Jobs, Job Description, Start Date & Time, End Date & Time, Progress and Status.
Columnar Definitions For First Table
#: Row number.
Jobs: Refers to the name of the Job.
Total Files: Refers to the total number of files within a job.
Columnar Definitions For Second Table
#: Row number.
In File Name:* Refers to the template used to describe the naming convention used for files received by a particular job.
In Path: The Input Path is where any inbound files for a specific job will be directed to and kept (i.e., stored).
Out File Name: Refers to the template used to describe the naming convention used for files sent by a particular job.
Out Path: The Output Path is where any outbound files for a specific job will be sent to.
Facility: This is the name of your internal agency that the job belongs to. For instance, if Company A has three subsidiaries, the name of the subsidiary that a job originated from, or is being communicated to, is the name you want to choose.
Columnar Definitions For Third Table
#: Row number.
Jobs: In this table, "Jobs" refers to all the individual" jobs (tasks) that were necessary to process the Job.
Job Description: Description of the type of job.
Start Date & Time: The time & date that a job started processing.
End Date & Time: The time & date that a job finished processing.
Progress: A progress bar that refers to a job's completion level.
Status:
* Completed: Means a job has successfully completed.
* Failed: Means that a job has failed to complete successfully.
* Yet to Start: A job that is scheduled to run at a specific time and date, but that time and date has not yet arrived.
* In Progress: Refers to a job that is currently* running.
* Discrepancy: -----
* Waiting on Approval: This status signifies that a job requires approval before it can begin processing.
Yet to Start
The Yet to Start screen displays the approved jobs that are waiting in the queue and have yet to start. They are grouped on the basis of job, and provide the following information:
-----
In Progress
The In Progress tab displays a listing of all jobs that are currently processing as well as their processing status.
View Drop-Down Details
-
First Table: On tab load, the only table listings are the row# and the job name. To view further details for a specific job, click on the expand (plus) icon, for the job row that you want to view more job details for. The second table appears.
-
Second Table: The second table shows a listing of all files processed for that job. The columns associated with the second table are: In File Name, In Path, Out File Name, Out Path and Facility. Note that each column header is a clickable link. Clicking on any of these links opens up the third table.
-
Third Table: The third table shows a status for the file row you selected from the second table. Columnar data includes: Jobs, Job Description, Start Date & Time, End Date & Time, Progress and Status.
Columnar Definitions For First Table
Completed
The Completed tab provides you with a listing of fully processed/completed jobs.
View Drop-Down Details
-
First Table: On tab load, the only table listings are the row# and the job name. To view further details for a specific job, click on the expand (plus) icon, for the job row that you want to view more job details for. The second table appears.
-
Second Table: The second table shows a listing of all files processed for that job. The columns associated with the second table are: In File Name, In Path, Out File Name, Out Path and Facility. Note that each column header is a clickable link. Clicking on any of these links opens up the third table.
-
Third Table: The third table shows a status for the file row you selected from the second table. Columnar data includes: Jobs, Job Description, Start Date & Time, End Date & Time, Progress and Status.
Columnar Definitions For First Table
#: Row number.
Jobs: Refers to the name of the Job.
Total Files: Refers to the total number of files within a job.
Columnar Definitions For Second Table
#: Row number.
In File Name:* Refers to the template used to describe the naming convention used for files received by a particular job.
In Path: The Input Path is where any inbound files for a specific job will be directed to and kept (i.e., stored).
Out File Name: Refers to the template used to describe the naming convention used for files sent by a particular job.
Out Path: The Output Path is where any outbound files for a specific job will be sent to.
Facility: This is the name of your internal agency that the job belongs to. For instance, if Company A has three subsidiaries, the name of the subsidiary that a job originated from, or is being communicated to, is the name you want to choose.
Failed
The Failed tab provides you with a listing of any failed jobs, as well as the reason(s) for the failure.
-----
Discrepancy
The purpose of the Discrepancy screen is to allow the user to view any mismatched files against a job’s configuration. The main benefit of the Discrepancy screen is that the user is able to locate any unnecessary files that have been placed in the path configuration.
- On tab load, select your path from the Path selection option.
- Click on the Search button to view table results.
- Click on the expand (plus) icon for the failed job that you would like to view the details for. This second table lists the files that...
-----
Waiting for Approval
The Waiting for Approval tab shows a list of jobs ready to process, and waiting for a user’s approval. This is where new incoming jobs land that have a valide path & file name. If they don't have a valid path & file name, they will land in the Disrepancy tab.
This tab provides two processing options:
- Automatic: With this process option, when a new file is identified by the system, then it will be processed automatically – without user approval.
- Manual: With this process option, when a new file is identified by the system, it will be listed in this table and will not run without a user’s approval.
-----
Filtering Files
The user has the option of filtering the files by entering in the Process Date, the Facility name, and/or the Job.
Auto Refresh
For continuous revisions, the user can refresh the page automatically by using the auto-refresh option. The refresh time is adjustable according to a user’s needs.
Export Details
Watch Log transaction details may be exported as a spreadsheet document by clicking on the Excel Export button.